Serverless + Dynamodb with nodejs
What is serverless?
Serverless means using third party managed service like AWS services or it could mean an event-driven architecture style. You can build them for nearly any type of application or for backend service. Serverless make it easy to build application using AWS Lambda.
Why use serverless?
For AWS serverless relies on cloud-formation which meant it will help you model and set up your Amazon Web Services resources so that you can spend less time managing those resources and more time focusing on your applications that run in AWS.
Prerequisites
- AWS account
- Nodejs
- AWS CLI and configuration
Getting started with serverless
To install serverless on your machine, run the following command
$ npm install serverless -gThis command will install serverless command-line in your machine. To check serverless is installed or not you can use following command.
serverless -v or sls -vNow, let's start building application step by step.
Step 1: Creating nodejs serverless project
We will scaffold our first micro-service for working with user. This will be responsible for saving user details and fetching single user details.
$ serverless create — template aws-nodejs — path user-service — name usersThis will create directory with following file
- handlers.js: handler.js is a file where you can define and write your lambda function.
- .gitignore: A gitignore file specifies intentionally untracked files that Git should ignore.
- serverless.yml: this section contains configuration of serverless framework. It contains two sections:
- Provider: This section declares configuration of specific cloud provider. You can specify name of cloud provider, region etc.
- Functions: This section is use to specify all functions that are included in your service.
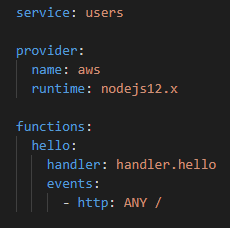
This is how serverless.yml looks after creating serverless service. Let’s go over the yml configuration:
- Service: Name of the service given while creating template.
- Provider: Name of the cloud provider you are using. Here we are using AWS.
- Functions: Functions contains function name i.e “hello”, handler i.e input function and events i.e HTTP request on which interaction will be done.
To deploy the function, execute serverless deploy command. This will upload zipped package.json file to AWS S3 and will convert handler.js function to AWS Lambda function and returns API endpoints.

Step 2: Saving data to Dynamodb
For saving data to Dynamodb you will need IAM user with appropriate permissions and table created in AWS Dynamodb service. I have used IAM user with AdministratorAccess permission. We’ll start by adding iamRoleStatemements to serverless.yml. This defines which actions are permissible.
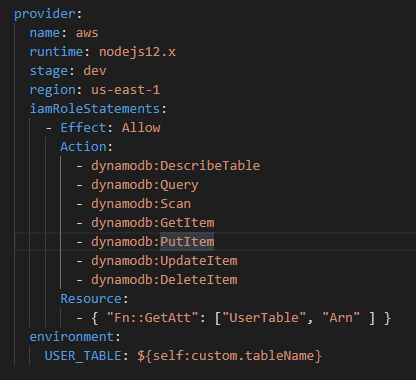
Here you can see “environment” variable which will be used in making HTTP request functions. Let's move ahead to resources.
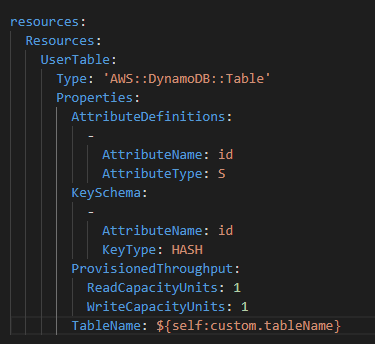
Role of resources in serverless.yml is to create table in AWS Dynamodb service.
Advantage of using Dynamodb is, you don’t have to define model just need to define what will be primary key of the model i.e number/string.
You have seen ${self:custom.tableName} in provider as well as resources meaning of the variable is table name is defined in custom and we are using that table name using ${self} something like this:

Now there is another variable ${self:provider.stage}, which takes current environment of application. We are using “dev” environment defined in provider.
serverless.yml
custom:
  tableName: 'users-${self:provider.stage}'

provider:
  name: aws
  runtime: nodejs12.x
  stage: dev
  region: us-east-1
  iamRoleStatements:
    - Effect: Allow
      Action:
        - dynamodb:DescribeTable
        - dynamodb:Query
        - dynamodb:Scan
        - dynamodb:GetItem
        - dynamodb:PutItem
        - dynamodb:UpdateItem
        - dynamodb:DeleteItem
      Resource:
        - { "Fn::GetAtt": ["UserTable", "Arn" ] }
  environment:
    USER_TABLE: ${self:custom.tableName}

functions:
  create:
    handler: users/create.create
    events:
      - http:
          path: users
          method: post

  get:
    handler: users/get.get
    events:
      - http:
          path: users/{id}
          method: get

resources:
  Resources:
    UserTable:
      Type: 'AWS::DynamoDB::Table'
      Properties:
        AttributeDefinitions:
          -
            AttributeName: id
            AttributeType: S
        KeySchema:
          -
            AttributeName: id
            KeyType: HASH
        ProvisionedThroughput:
          ReadCapacityUnits: 1
          WriteCapacityUnits: 1
        TableName: ${self:custom.tableName}
Let's create rest API for users for that create folder “users” which contains different file for creating user and fetching user API.
For creating user: users/create.js
const AWS = require('aws-sdk')
const UserTable = process.env.USER_TABLE
const dynamoDb = new AWS.DynamoDB.DocumentClient()

module.exports.create = (event, context, callback) => {
    const data = JSON.parse(event.body);
    const params = {
        TableName: UserTable,
        Item: {
            id: data.id,
            name: data.name
        }
    }
    dynamoDb.put(params, (err) => {
        if (err) {
            console.log(err);
        }
        const response = {
            statusCode: 200,
            body: JSON.stringify(params.Item),
        };
        callback(null, response);
    });
}
For fetching user: users/get.js
const AWS = require('aws-sdk')
const UserTable = process.env.USER_TABLE
const dynamoDb = new AWS.DynamoDB.DocumentClient()

module.exports.get = (event, context, callback) => {
    const params = {
        TableName: UserTable,
        Key: {
            id: event.pathParameters.id,
        },
    };

    dynamoDb.get(params, (error, result) => {
        if (error) {
            console.error(error);
            callback(null, {
                statusCode: error.statusCode || 501,
                headers: { 'Content-Type': 'text/plain' },
                body: 'Couldn\'t fetch the users.',
            });
            return;
        }

        // create a response
        const response = {
            statusCode: 200,
            body: JSON.stringify(result.Item),
        };
        callback(null, response);
    });
};
Now let’s deploy our rest API using serverless by following command.
serverless deploy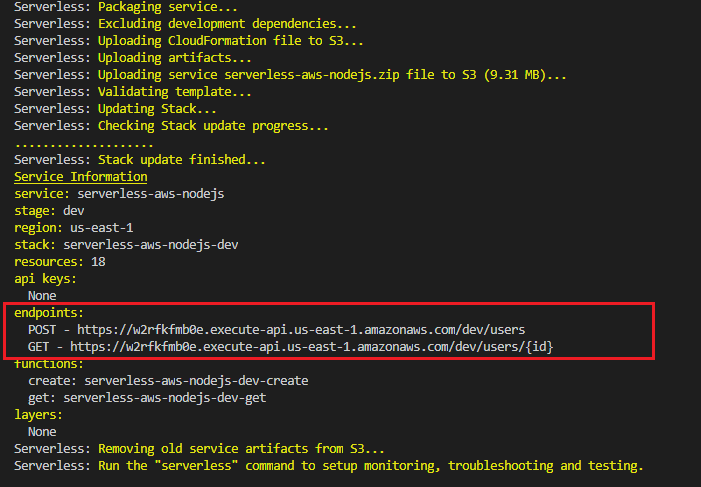
Our post and get APIs are deployed successfully with above shown endpoints. Let's use endpoint to create user:
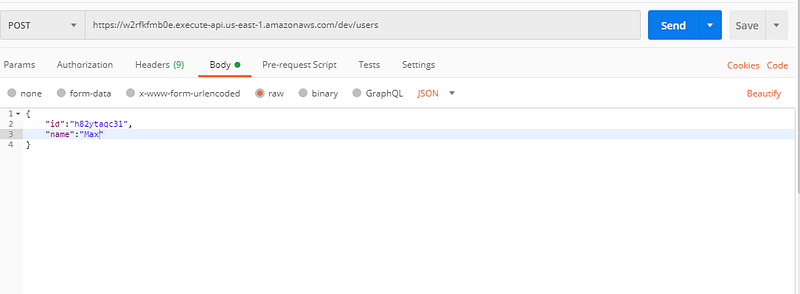

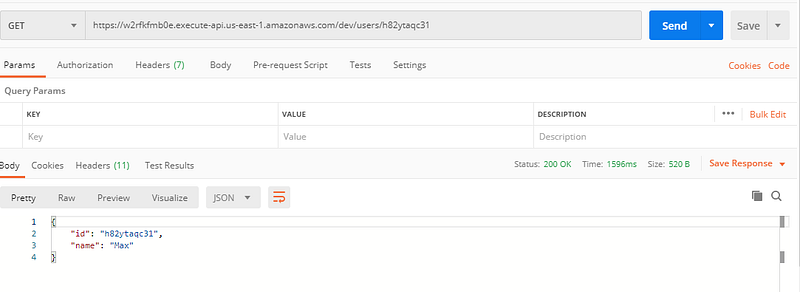
Here we go, our first user is successfully created!!!. Now lets try to fetch that user by passing unique id.
Conclusion
There is lot more to explore AWS services including dynamodb, Now as we have build rest APIs using serverless and dynamodb, you can start building your serverless rest API.
Thank you for reading!!
Here is sample code.
https://github.com/Kajal18/serverless-dynamodb-nodejs
Reference