How to Manage Multiple Target Variant with React Native Apps
In this tutorial, we will be discussing how to manage multiple build variants within react-native. This tutorial will give a brief overview of build variants with react native apps. This might be helpful while we are creating applications with minimal differences like app icons, splash screens, themes as well as helping to create different stages of application development like staging, production, UAT and development.
Now, we will start understanding the creation of build variants of targets to share common codes for all apps and we can use all apps simultaneously on the device at the same time.
For example, you find yourself in a situation where you need to create an application for different environments builds. While manually changing or replacing files works, its often very time consuming and the possibility of throwing errors, and mainly one forgotten step can lead to many hours of hair-pulling.
Here is where we go with iOS build configuration or different target creation and Android build variants come in. In iOS, we can use both the option but it can be needed some mandatory steps to follow, and in this tutorial will discuss both the options. Together, they will allow you to use both applications simultaneously on the same device and test all features of it. But I prefer to build configuration options rather than the creation of variant targets.
Let’s start first with the iOS build configuration version.
iOS
- Adding new configurations
- Firstly, select your project under
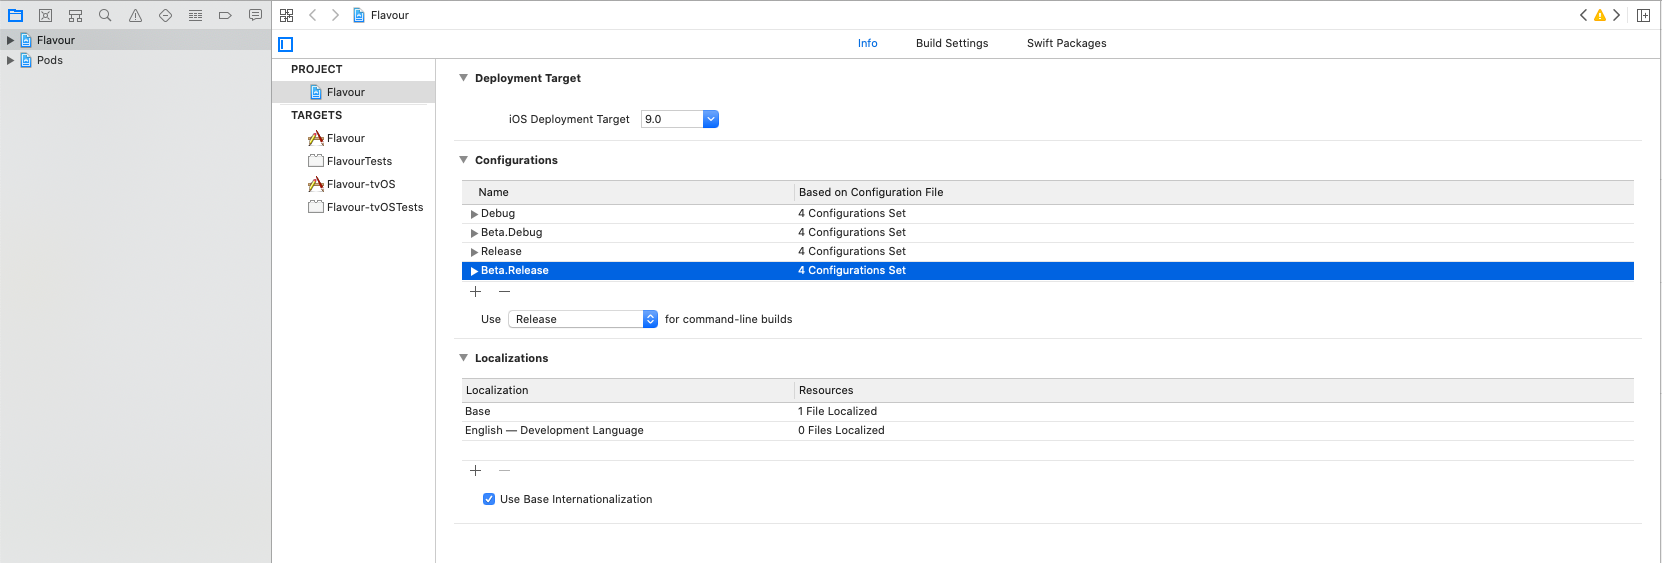
PROJECTin Xcode, and click theInfotab, search for Configurations. - There you should have two default configurations like
DebugandRelease.
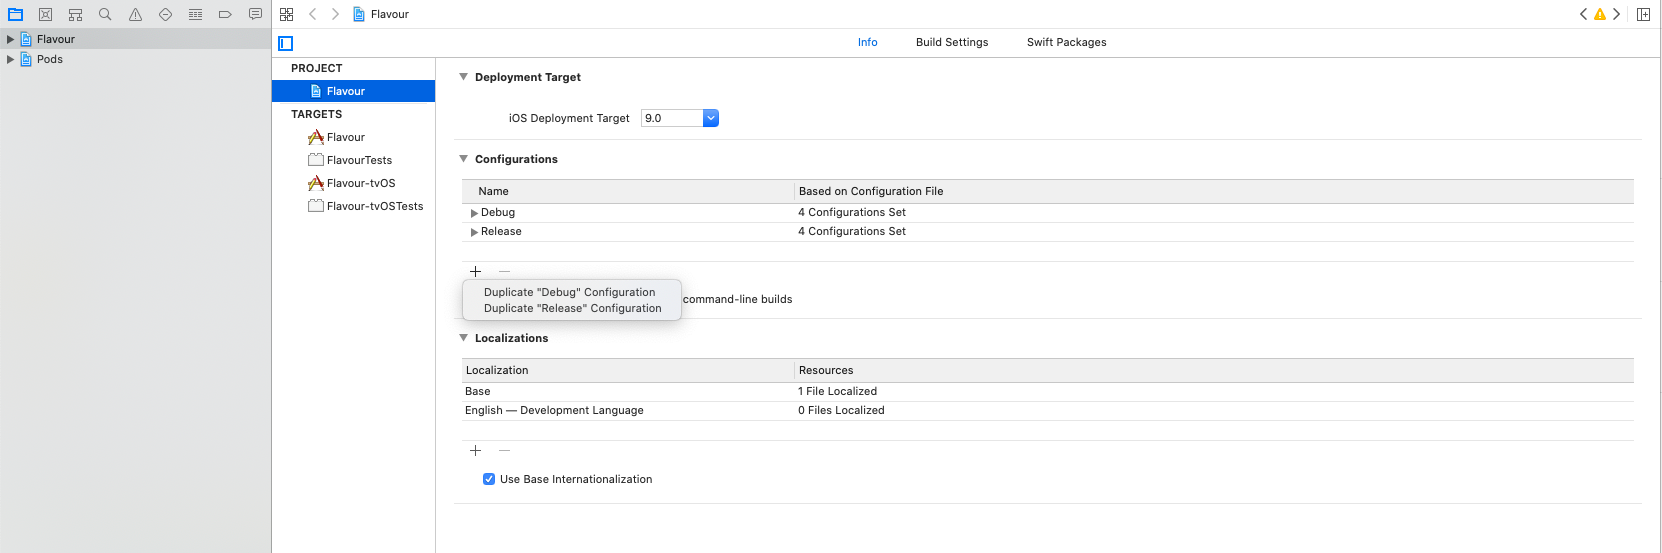
- After that click on the
+button and make sure you have to duplicate both the configurations, name them respectively whatever you like to set. In the below screenshot, you’ll find my configurations namedBeta.DebugandBeta.Release.
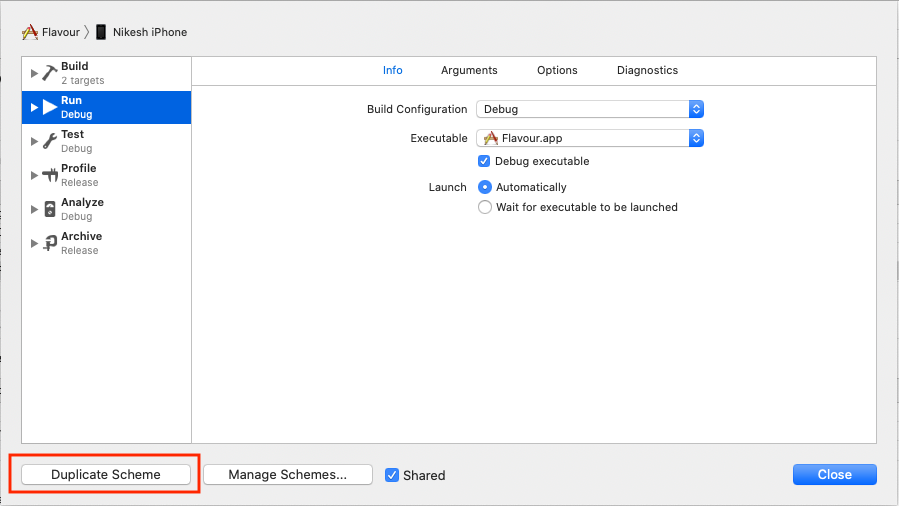
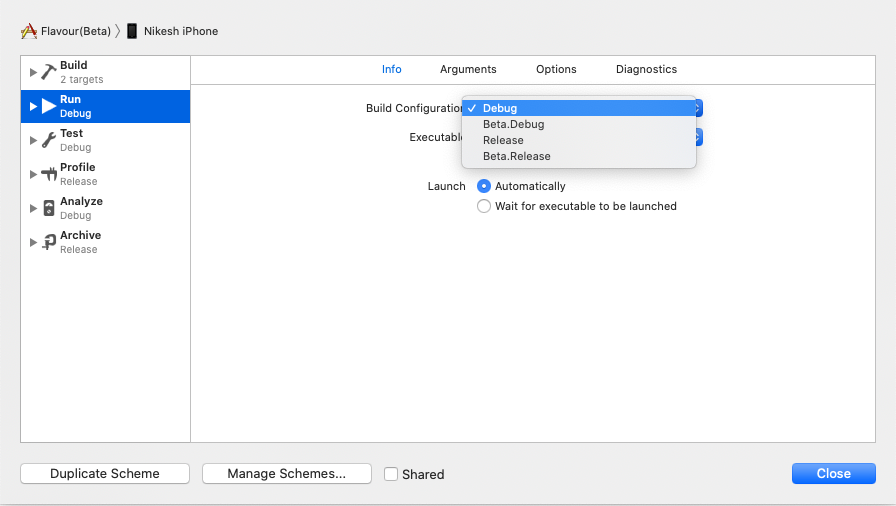
2. Adding new schemes
- Click on the active scheme from your project and from the drop-down, select the Edit Scheme option and it will open up scheme manage window.
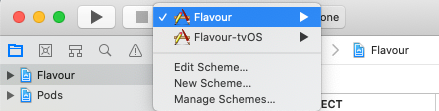
- Now you can click on the Duplicate scheme button at the bottom of the window to create a copy of the current scheme and rename it which you want to set. After that, please don’t close the window because we have to change the few options of run/build. Now, change the build configuration options of
Run,Test, andAnalyzeto use the Debug configuration which we replicated from Debug. Moreover, forArchiveandProfileto use Release replicated configuration.
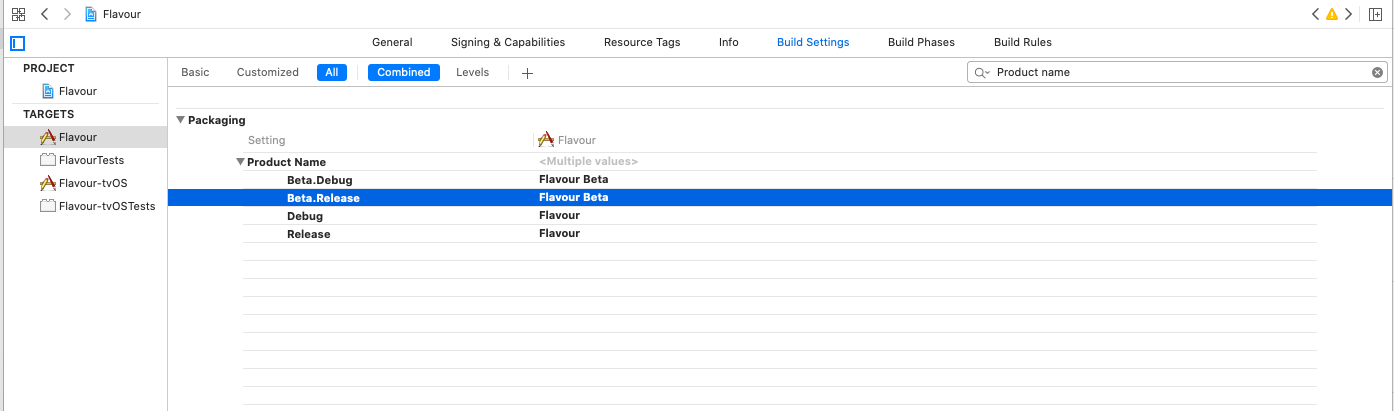
3. Display different names
- Select your target and in the Build Settings tab, look for Product Name. Change the name which you have to set for New Configuration. For example, you have created
Beta.DebugandBeta.Releaseconfiguration so, you have to set the same for both configurations.
Note: Make sure, In the project’sinfo.plist, change the value ofBundle display nameto$(PRODUCT_NAME)
4.a For React-Native versions ≥ 0.60
- You have to add the following code into your
Podfile. In this, you have to define all the configurations ofDebugandRelease.
platform :ios, '9.0'
require_relative '../node_modules/@react-native-community/cli-platform-ios/native_modules'

project 'Flavour',
'Beta.Debug' => :debug,
'Beta.Release' => :release,
'Prod.Debug' => :debug,
'Prod.Release' => :release
4.b For React-Native versions < 0.60
- Please refer the react-native-schemes-manager library for configuration.
- Additionally, we have to setup
package.jsonaccording to the library documentation. Please do the following changes insidepackage.jsonfile as following.
{
	....
	"scripts": {
		....
        "postinstall": "react-native-schemes-manager all"
    },
	"xcodeSchemes": {
        "Debug": [
            "Beta.Debug"
        ],
        "Release": [
            "Beta.Release"
        ],
        "projectDirectory": "iOS"
    },
    "projectDirectory": "iOS"
	....
}
5. Running multiple configuration of application side by side
- You might have noticed that if you run the project by selecting your respective scheme, the alternatives of the scheme will replacing each other. To be able to run multiple configurations simultaneously, we will need to set up a unique bundle ID for each of them.
- Select your
Targetand in theBuild Settingstab, click on the+button and selectAdd User-Defined Settingsto create a new user setting, give it the nameBUNDLE_ID_SUFFIX. Add the suffix for respective scheme.
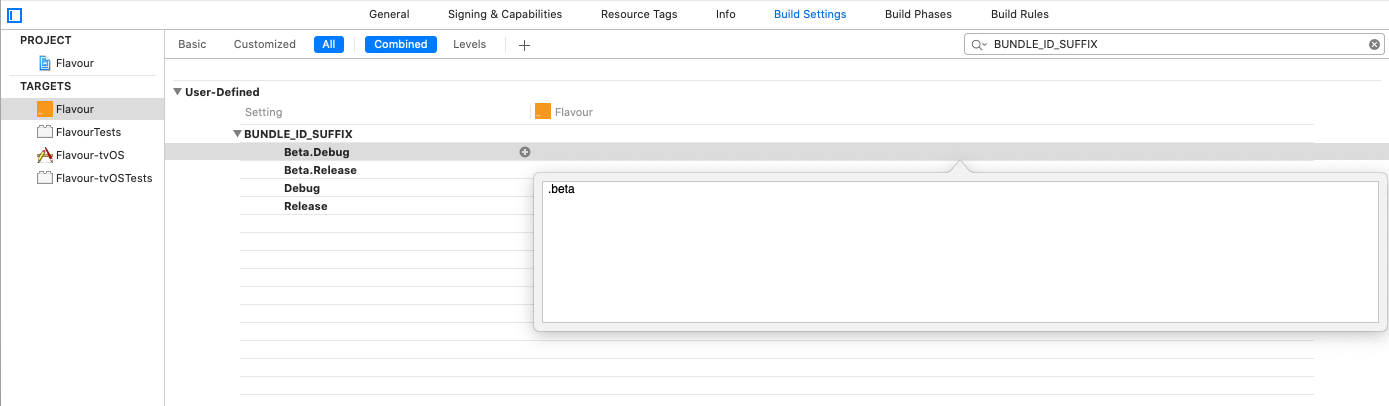
- After that in the project’s
info.plistfile, change the value ofBundle Identifierto$(PRODUCT_BUNDLE_IDENTIFIER)$(BUNDLE_ID_SUFFIX) - Alternatively, we can also set a different bundle identifier for different schemes. For this please select your Target and in the Build Settings tab, click on the + button and look for Product Bundle Identifier and replace it with your valid Bundle Identifier.

Note: Please register your bundle identifier on apple developer account.
6. Different icons for different configurations
- To differentiate application, we can also set appropriate display icons for specific configurations. Please note that you have to change application settings for icons from Xcode.
- For this implementation, please add AppIcon inside
Image.xcassetsand set the respective names for AppIcon asset.
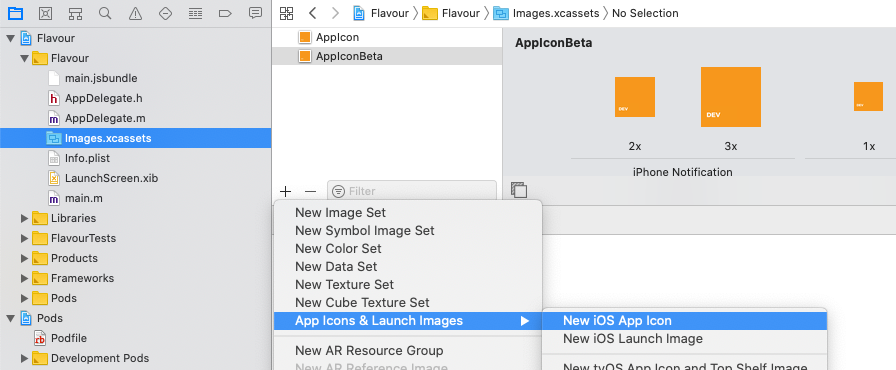
- Select your
Targetand in theBuild Settingstab, locate theAsset Catalog App Icon Set Namesetting.

- You can also set name using
BUNDLE_ID_SUFFIXbut for that image, asset name append withBUNDLE_ID_SUFFIXvalue which we have set instep 5. For that, you have to append suffix with your recently created configurations.
7. Run any configuration via command line
- You can run the different configurations via command line by using the following code snippet.
react-native run-ios --simulator\"iPhone8\" --scheme <SCHEME_NAME> --configuration <SCHEME_CONFIGURATION_TYPE>react-native run-ios --device\"<DEVICE_NAME>\" --scheme <SCHEME_NAME> --configuration <SCHEME_CONFIGURATION_TYPE>
----------OR----------
react-native run-ios --device\"<DEVICE_UNIQUE_ID>\" --scheme <SCHEME_NAME> --configuration <SCHEME_CONFIGURATION_TYPE>Note: SCHEME_CONFIGURATION_TYPE = In my case, configuration typeBeta.DebugandBeta.Releasewhich is replicated fromDebugandRelease.
- You can also set splash screens and manage info.plist for your configurations if you want to use separate one. Just you have to search for splash screen inside Build settings by using the term
Launchyou will see optionAsset Catalog Launch Image Set Name.
Let's start creation with different target.
- Adding new target
- By adding multiple targets you have to replicate target from an existing one. To replicate Right-click on your current target and select the duplicate option from the menu.
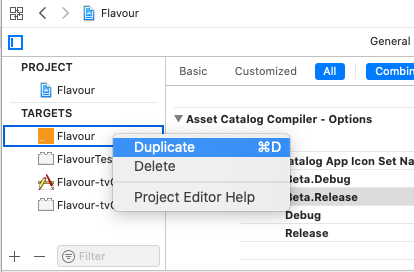
- After selecting the option you have to select duplicate only option form the prompt which pops up. Likewise, you can also follow the configuration setup for the replicated target and manage it.
- Make sure if you are using pods for specific projects you have to make the following change inside your pod file.
# Uncomment the next line to define a global platform for your project
platform :ios, '9.0'

def shared_pods
	pod <POD_NAME>
    # Define Pods for your projects
end

target <MAIN_TARGET_NAME> do
	.....
  shared_pods
	.....
end

target <REPLICATED_TARGET> do

  shared_pods

end

end- For this newly created target, you can also set app icon, bundle identifier, splash screens like as above.
Android
Now let us begin with the android part. For Android equivalent to iOS’s build configuration is known as Build Variants or Product Flavours.
- Adding Product Flavor
- Open projects and navigate to this path
android/app/and openbuild.gradlefile. Inside file adds a new section calledproductFlavors, and put our flavor specific configuration inside this file. - Make sure to use a different
applicationIdfor each flavor so we can have them all installed on the device at the same time. - After that don’t forget to add the
flavorDimensions “default”line otherwise, the build will be throwing error. - Your
build.gradlefile looks like this as the following code snippet.
android {
    .....

    flavorDimensions "default"  // <-- !!! add this line !!!

    ....
    productFlavors {
        dev {
            minSdkVersion rootProject.ext.minSdkVersion
            applicationId <BUNDLE_ID>
            targetSdkVersion rootProject.ext.targetSdkVersion
            resValue "string", "build_config_package", "com.myapp"
        }
        beta {
            minSdkVersion rootProject.ext.minSdkVersion
            applicationId <BUNDLE_ID>
            targetSdkVersion rootProject.ext.targetSdkVersion
            resValue "string", "build_config_package", "com.myapp"
        }
    }
    ....
}
2. Custom icons for each build variant
- Now another step to set different icons and launch Image for your project’s flavor variants you need to create folders inside path
android/app/srcand create directories with the name containing flavor name which we set inandroid/app/build.gradlefile. Your directory structure looks like below.
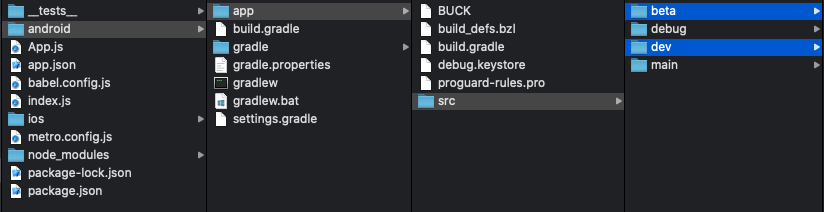
- Now you have place any flavor specific icons inside these folders. For that, you have to create a
resdirectory inside each folder. You can take the reference ofmainfolder if you need the help of the folder structure for each type of app resource. In android, the way this works is when you build your app, the build process will first try to locate the resources inside a folder which depends on the name of the flavor. If it will not able to locate it will locate insidemainfolder.
3. Different app names for each flavor
- Now, if we want to change app name for each build variant we can achieve this by placing
strings.xmlfile insideres/valuesfolder of each build variant. strings.xmlfile looks like below:
<resources>
    <string name="app_name">{APP_NAME}</string>
</resources>
Note: Thisstrings.xmlfile will be merged with file which located atmainfolder rather than replacing it.
- We can also change different launch screen for different build variant by adding the same name resources inside
resfolder of each build variant.
4. Run and build a variant through a command line
- You can run the different configurations via command line by using the following code snippet.
react-native run-android --variant=<productFlavour><BuildType>- For generating release apk, use the following code snippet.
cd android && ./gradlew assemble<productFlavour>ReleaseThat's all for managing multiple target variant with React Native Apps.
- I hope these insights may be helpful for you to achieve your requirements. Thank you very much for reading this article.
- If you want to use
.envfiles for things like your API key, Base URLs, App Name and App versions, check out a library called react-native-config.