Getting started with gatsby theme
Introduction
If you've ever created a Gatsby site from complete scratch, you would've noticed that there are many decisions to make, like, where your data is stored, how it is accessed, how it is styled and displayed, etc.
To quote from official docs:
Gatsby themes are plugins that include a gatsby-config.js file and add pre-configured functionality, data sourcing, and/or UI code to Gatsby sites. You can think of Gatsby themes as separate Gatsby sites that can be put together and allow you to split up a larger Gatsby project!
Meaning Gatsby Theme are like a base of a building you are constructing. You don't have to dig underground and worry what kind of bricks and composition of cement is required, it's all taken care by Theme. You will get the predefined base and have to make from that. And trust me, that's the hardest part.
So, lets proceed and by the end of this tutorial, you would have learn how to use Gatsby theme by creating a new site using official Gatsby blog theme.
Using a Theme
Before continuing, for this you'll require Gatsby installed on your system. If you don't have it, follow this link.
Now enter the following code and it will make new directory my-blog all the necessary dependencies will be installed for you:
gatsby new my-blog https://github.com/gatsbyjs/gatsby-starter-blog-theme
Run the site
Next, run these command to run the site and go to localhost:8000 and see what you get
cd new-blog
gatsby develop

There you go! Your site is ready within 5 minutes. Hooorrraaayyyy!! 🎉🎉 Wait before we publish lets customise it a bit.
Replace your avatar
Theme comes with default grey image as your avatar. You can update it by overwriting the file located at /content/assets/avatar.png
Update your site metadata
Customise the site meta data and fill your relevant information in gatsby-config.js file
 plugins: [
   {
     resolve: "gatsby-theme-blog",
     options: {},
   },
 ],
 // Customize your site metadata:
 siteMetadata: {
   title: "Tech Blog",
   author: "Aditya Doriwala",
   description: "A collection of my thoughts and writings on trending tech.",
   siteUrl: "https://blog.logicwind.com/",
   social: [
     {
       name: "twitter",
       url: "https://twitter.com/",
     },
     {
       name: `github`,
       url: `https://github.com/`,
     }
   ],
 },
}
Replace the content of the bio
One of the many advantages of using Gatsby theme is that is come with a feature called Component Shadowing. With the help of which you can override any components included in theme with your own custom component.
To use component shadowing first you will have to find the contents you want to replace in Gatsby theme package, which can be found in node_modules/gatsby-theme-blog . For example, to change the bio of your site, first find it in the Gatsby theme package. You can find it at node_modules/gatsby-theme-blog/src/components/bio-content.js.
If you look at the file tree of your site, you’ll see it looks like this:
my-blog
├── content
│   ├── assets
│   │   └── avatar.png
│   └── posts
│       ├── hello-world.mdx
│       └── my-second-post.mdx
├── src
│   └── gatsby-theme-blog
│       ├── components
│       │   └── bio-content.js
│       └── gatsby-plugin-theme-ui
│           └── colors.js
├── gatsby-config.js
└── package.json
Notice that in src directory there is gatsby-theme-blog directory. Any files you place in this directory that matches path in node_modules/gatsby-theme-blog directory will completely shadow the theme i.e. override the theme.
Important note:
💡 The name of the directory (here gatsby-theme-blog) must exactly mirror the name of the published theme package, which in this case is gatsby-theme-blog.
Now open up bio-content.js and make some changes:
import React, { Fragment } from "react"
export default () => (
<Fragment>
This is my updated bio.
<br />
It's shadowing the content from the theme.
</Fragment>
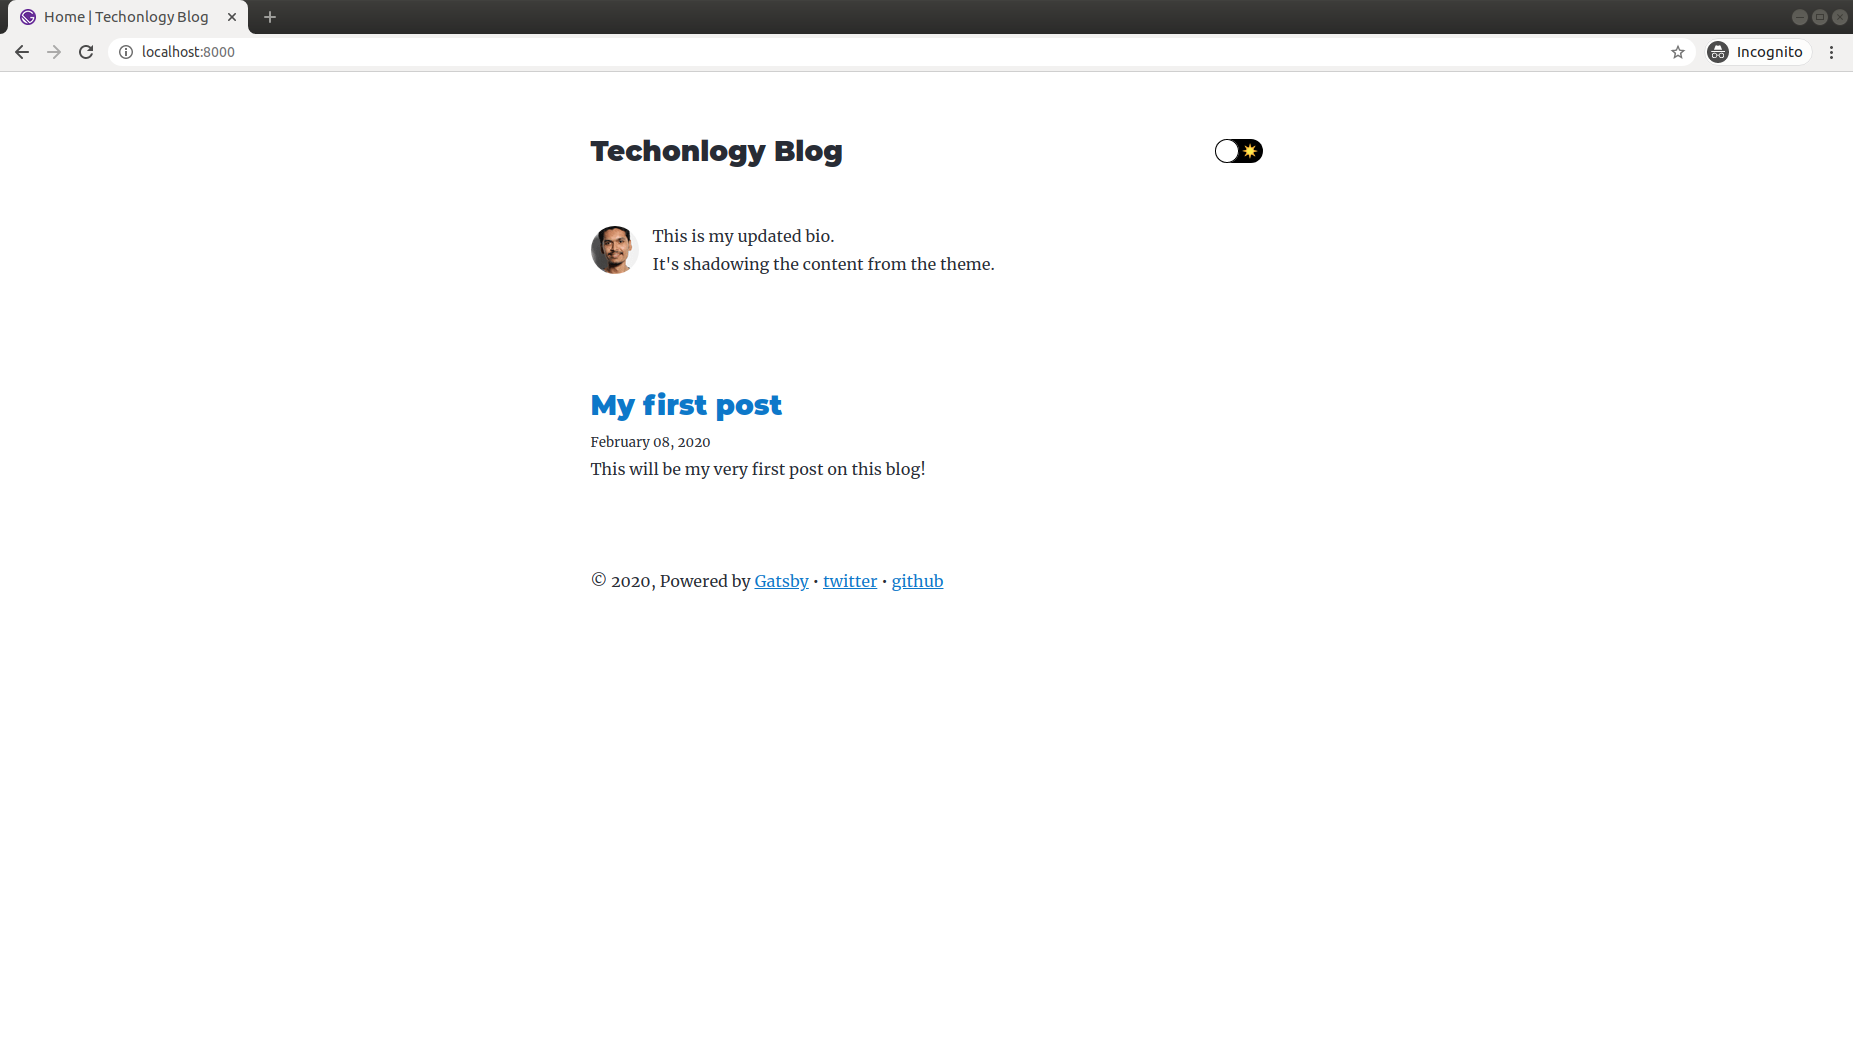
)Now check back in the browser, you should see updated avatar, bio and site details.

Adding our own blog content
Now we will edit our own content replacing the default content theme is packed with.
Create a new blog post
Create a new file in my-blog/content/posts. Name it whatever you’d like (with a .md or .mdx file extension), and add some content! Here’s an example:
---
title: My first post
date: 2020-02-08
---

This will be my very first post on this blog!
Save it as my-first-blog.mdx .
Delete the demo posts
Delete the two demo posts in the /content/posts directory:
my-blog/content/posts/hello-world.mdxmy-blog/content/posts/my-second-post.mdx
Restart the server with gatsby develop, and you’ll see your updated blog content:
Change the color theme
The blog theme comes with a default Gatsby purple theme, but you can override, thanks to component shadowing, and customise the look of your site to your wish. Let see how we can achieve that.
Open up /src/gatsby-theme-blog/gatsby-plugin-theme-ui/colors.js, and uncomment the code in that file.
Now, instead of a purple theme, you have a blue theme instead:
In this file we are getting all the theme related css from gatsby-plugin-theme-ui (imported as defaultThemeColors here) which by default is installed in the theme we are using. Then we are updating few parts like text color, color or dark mode, etc.
To see what other theme colors you can customise, check out the colors.js file in the official blog theme (node_modules/gatsby-theme-blog/src/gatsby-plugin-theme-ui/colors.js)
Conclusion
This was a step-by-step introduction to using a Gatsby theme with hands on example, building a blog. Note that different themes will be built differently, to accept different customisation options. To dive deeper, check out the Gatsby Theme docs.