Implement Carousel using a React-Native ScrollView Component
In this article, we will implement a carousel using React-Native ScrollView Component. Implementation will not be including any 3rd party carousel library. The basic purpose of the article to achieve pretty simple implementation. We are looking at the kind of following stuff.
What will we do through this article
- We will have a carousel which has 2 items on each page. A Carousel can be swipe left or right to see other item in carousel.
- Adjust images as per aspect ratio.
- In below-attached image, you can see only 2 images per carousel page. We will try to make it dynamic no of the item on the page and they will adjust based on no of the column you want to show on a carousel page.
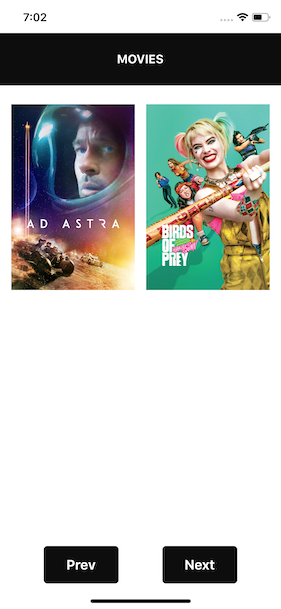
- A Carousel will be also able to perform swipe next and previous using the external component as well, like as you can see next and previous button in the following image. Next button will swipe a carousel left and show you next page of the item and Prev button will swipe carousel right and show you the previous page of item.
- Handling next and prev possibilities for e.g if you are on the first page then you can't go to the prev page and if you are on last page of carousel then you cannot go to the next page.
Using React-Native ScrollView is not only the option. You will find lots of React-Native Carousel Component on internet. Here are couple of them:
1. react-native-snap-carousel
2. react-native-swiper
Configure ScrollView Component to work as a Carousel
From the above-attached image, you can identify that a carousel will be swiping horizontally. Before configuring scrollview let us review some of the property which will help us to do that. Those properties belong to scrollview.
horizontal: ScrollView default scroll direction is vertical that is up and down. For our carousel requirement, we need scroll direction horizontal that is left and right. For that, we need to add property horizontal as true which enables scrollview to scroll horizontally. Default: falsepagingEnabled: After adding horizontal property you will see that scrollview starts scrolling horizontally but that scroll is continued scroll. To provide a carousel kind of effect we need to pause scroll after screen size page. Scrollview stops on multiples of the scroll view's size when scrolling. this property can be used for horizontal pagination. we need to add this property as true. Default : falseshowsHorizontalScrollIndicator: This property helps us to show/hide the scroll indicator. We don't want to show scroll indicator in a carousel so we will add this property with the false value. Default: true
Above mention 3 property will make you scroll view work like a carousel. Here is how the code looks like.
import React, { Component } from 'react'
import { View, Text, ScrollView, Dimensions } from 'react-native'
import styles from './style'
const { width } = Dimensions.get('window')

export default class MovieHome extends Component {
  render() {
    return (
      <View style={styles.container}>
        <View style={styles.navBar}>
          <Text style={styles.navBarTitle}>MOVIES</Text>
        </View>
        <ScrollView
          horizontal
          pagingEnabled
          showsHorizontalScrollIndicator={false}
        >
          <View style={{ backgroundColor: "blue", flex: 1, width: width }}></View>
          <View style={{ backgroundColor: "red", flex: 1, width: width }}></View>
          <View style={{ backgroundColor: "yellow", flex: 1, width: width }}></View>
        </ScrollView>
      </View>
    );
  }
}
Now let's start with things that we mention in starting of article.
Arrange two cards in one slide
In the above code snippet, you can see how we had configured ScrollView to work as a carousel. You can see 3 view components wrap inside scrollview means three slides are there.
Now our goal is two have 2 cards or tile on single slide means on three slider total 6 cards will be there. So let do some math to arrange two cards on a single slide and adjust them as per different screen size as well. I had attached an image in which I had mention what we want to achieve on a single slide.
1. Two cards.
2. The card has an in-between space of 15pt.
3. Also, 1st card has 15pt space on left and 2nd card had 15pt space on right.
So we need to calculate total space or padding that we need to leave for proper card arrangement. it's 15+15+15 = 45 pt
Now get the device total width so we can equally divide the width between two cards. We can get ScreenWidth from Dimensions as shown in below code snippet:
import { Dimensions } from 'react-native'

const { width: screenWidth, height: screenHeight } = Dimensions.get('window')
Now we have screen width so based on that we can identify width of each card on screen. Here we are planning to show 2 card in slide. So below code snippet for calculation.
// screenWidth is import from Dimensions
const imageWidth = screenWidth / 2
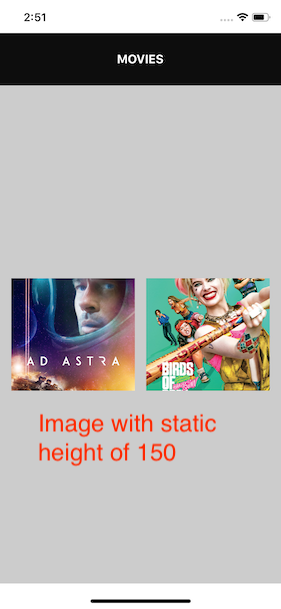
// Right now we are considering image height static without considering aspect ratio. Don't worry I we will also explain how to set dynamic height based aspect ratio.
const imageHeight = 250
Now we will be adding addition some style to look page proper. Here are the code snippets and screenshot; how it looks with the above calculation.
index.js
import React, { Component } from 'react'
import { View, Text, ScrollView, Dimensions, Image } from 'react-native'
import styles from './style'
const { width: screenWidth, height: screenHeight } = Dimensions.get('window')

const imageWidth = (screenWidth) / 2
export default class MovieHome extends Component {
  render() {
    return (
      <View style={styles.container}>
        <View style={styles.navBar}>
          <Text style={styles.navBarTitle}>MOVIES</Text>
        </View>
        <ScrollView
          contentContainerStyle={styles.scrollViewContainerStyle}
          horizontal
          pagingEnabled
          showsHorizontalScrollIndicator={false}
        >
          <View style={{ width: screenWidth, flex: 1 }}>
            <View style={{ width: imageWidth }}>
              <Image source={{ uri: 'https://image.tmdb.org/t/p/w1280/xBHvZcjRiWyobQ9kxBhO6B2dtRI.jpg' }}
style={{ width: imageWidth, height: 250 }} />
            </View>
            <View style={{ width: imageWidth }}>
              <Image source={{ uri: 'https://image.tmdb.org/t/p/w1280/z7FCF54Jvzv9Anxyf82QeqFXXOO.jpg' }}
style={{ width: imageWidth, height: 250 }} />
            </View>
          </View>
        </ScrollView>
      </View>
    )
  }
}
styles.js
import { StyleSheet } from 'react-native'

const styles = StyleSheet.create({
  container: {
    flex: 1,
    justifyContent: 'center',
    alignItems: 'center',
    alignContent: 'center',
    backgroundColor: '#FFFFFF',
  },
  navBar: {
    width: '100%',
    height: 70,
    backgroundColor: '#0D0D0D',
    alignContent: 'center',
    justifyContent: 'center'
  },
  navBarTitle: {
    color: 'white',
    fontSize: 16,
    fontWeight: "bold",
    alignSelf: 'center'
  },
  scrollViewContainerStyle: {
    alignContent: 'center',
    justifyContent: 'center',
    alignItems: 'center',
    height: 600
  }
});

export default styles
Here is a screenshot of how the above code will look on page.
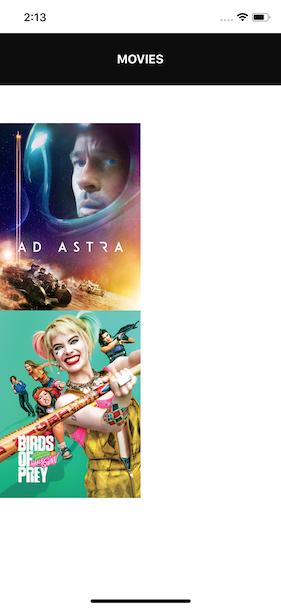
In the above screenshot, we can see that card rendered vertically we need to arrange them horizontally. Here we add some style that allows to card arrangement horizontally. In the screenshot, I had added a background color to scrollview so you can see edges.
import React, { Component } from 'react'
import { View, Text, ScrollView, Dimensions, Image } from 'react-native'
import styles from './style'
const { width: screenWidth, height: screenHeight } = Dimensions.get('window')

const imageWidth = (screenWidth) / 2
const imageHeight = 250
export default class MovieHome extends Component {
  render() {
    return (
      <View style={styles.container}>
        <View style={styles.navBar}>
          <Text style={styles.navBarTitle}>MOVIES</Text>
        </View>
        <ScrollView
          ref={(ref) => { this.stepCarousel = ref }}
          contentContainerStyle={styles.scrollViewContainerStyle}
          horizontal
          pagingEnabled
          showsHorizontalScrollIndicator={false}
        >
          <View style={{ flexDirection: 'row', justifyContent: 'space-between', width: screenWidth }}>
            <View style={{  width: imageWidth }}>
              <Image source={{ uri: 'https://image.tmdb.org/t/p/w1280/xBHvZcjRiWyobQ9kxBhO6B2dtRI.jpg' }}
              style={{ width: imageWidth, height: imageHeight }} />
            </View>
            <View style={{ width: imageWidth }}>
              <Image source={{ uri: 'https://image.tmdb.org/t/p/w1280/z7FCF54Jvzv9Anxyf82QeqFXXOO.jpg' }}
              style={{ width: imageWidth, height: imageHeight }} />
            </View>
          </View>
        </ScrollView>
      </View>
    )
  }
}
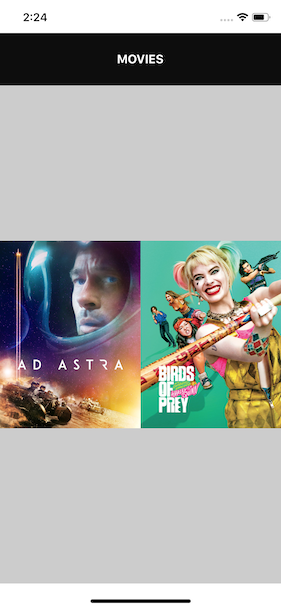
You can see that both cards are fully covering screen we need to add also padding around and between card as well. Also, note that scrollview is also covering the full screen. We need to adjust screen scrollview and image height based on the aspect ratio of the device screen. Which we will cover in the next point. As of no we will add padding. Check out the updated snippet and screenshot.
import React, { Component } from 'react'
import { View, Text, ScrollView, Dimensions, Image, ToastAndroid } from 'react-native'
import styles from './style'
const { width: screenWidth, height: screenHeight } = Dimensions.get('window')

const cardPadding = 15
const totalPadding = 15 * 3 // left-side, in-between, right-side
const imageWidth = (screenWidth - totalPadding) / 2
const imageHeight = 250
export default class MovieHome extends Component {
  render() {
    return (
      <View style={styles.container}>
        <View style={styles.navBar}>
          <Text style={styles.navBarTitle}>MOVIES</Text>
        </View>
        <ScrollView
          ref={(ref) => { this.stepCarousel = ref }}
          contentContainerStyle={styles.scrollViewContainerStyle}
          horizontal
          pagingEnabled
          showsHorizontalScrollIndicator={false}
        >
          <View style={{ flexDirection: 'row', justifyContent: 'space-between', width: screenWidth, paddingHorizontal: cardPadding }}>
            <View style={{ width: imageWidth }}>
              <Image source={{ uri: 'https://image.tmdb.org/t/p/w1280/xBHvZcjRiWyobQ9kxBhO6B2dtRI.jpg' }}
                style={{ width: imageWidth, height: imageHeight }} />
            </View>
            <View style={{ width: imageWidth }}>
              <Image source={{ uri: 'https://image.tmdb.org/t/p/w1280/z7FCF54Jvzv9Anxyf82QeqFXXOO.jpg' }}
                style={{ width: imageWidth, height: imageHeight }} />
            </View>
          </View>
        </ScrollView>
      </View>
    )
  }
}
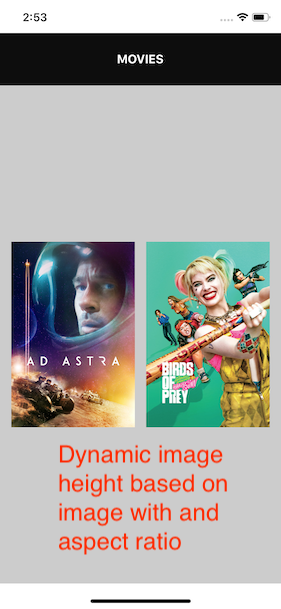
Adjust image based on aspect-ratio
In the preview section, you have seen that the image has static height and we had also fixed 2 cards on a single slide. Adjusting image height will allow you to set image height properly so that the image looks as per aspect ratio. This calculation will also allow us to add dynamic no of a card in a slide. This means how many cards we need on a slide that we can configure.
To adjust the image aspect ratio, first of all, you need to identify the image aspect ratio. I am considering that images will be having the same size as the aspect ratio. The image that we are using in the card has width: 1920 and height: 1280, here if we try to find out the aspect ratio of image them it will be 2:3. You can find out aspect ratio from here. So now we have our image aspect ratio we can now calculate image height based on that. Here is the code snippet of calculation.
const cardPadding = 15
const totalPadding = cardPadding * 3 // left-side, in-between, right-side
const imageWidth = (screenWidth - totalPadding) / 2

// we had calculated imageHeight based on imageWidth and image aspect ratio

const imageHeight = (imageWidth / (2 / 3)) //2:3 aspect ratio
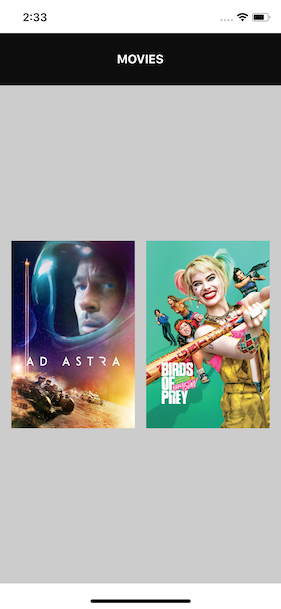
Here you can see two screen images. One screen has a static image height of 150 and the second screen has a dynamic height image based on above mention calculation.
Dynamic no of card on slide (calculation & configuration)
Now for example if you need three images in one slide then there will be simple calculation and you can do that easily. Here is code which help us to dynamically adjust card width, height and padding.
const cardPerSlide = 2
const cardPadding = 15
const paddingAround = cardPadding * 2 // slide horizontal padding
const cardBetweenPadding = cardPadding * (cardPerSlide - 1)
const totalPadding = paddingAround + cardBetweenPadding
const imageWidth = (screenWidth - totalPadding) / cardPerSlide
const imageHeight = (imageWidth / (2 / 3))
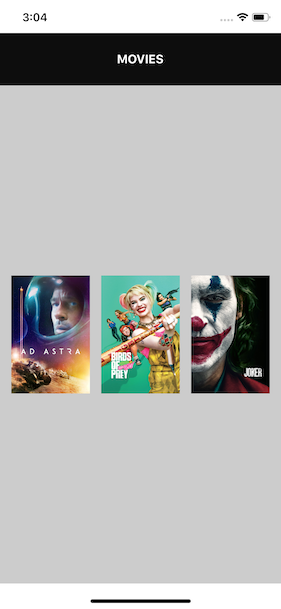
Now just add one more image in ScrollView and make cardPerSlide to 3. And see how image are adjusted in slide without stretching or cutting any part of image. Here is the code snippet and screenshot.
import React, { Component } from 'react'
import { View, Text, ScrollView, Dimensions, Image, ToastAndroid } from 'react-native'
import styles from './style'
const { width: screenWidth, height: screenHeight } = Dimensions.get('window')

const cardPerSlide = 3
const cardPadding = 15
const paddingAround = cardPadding * 2 // slide horizontal padding
const cardBetweenPadding = cardPadding * (cardPerSlide - 1)
const totalPadding = paddingAround + cardBetweenPadding
const imageWidth = (screenWidth - totalPadding) / cardPerSlide
const imageHeight = (imageWidth / (2 / 3))
export default class MovieHome extends Component {
  render() {
    return (
      <View style={styles.container}>
        <View style={styles.navBar}>
          <Text style={styles.navBarTitle}>MOVIES</Text>
        </View>
        <ScrollView
          ref={(ref) => { this.stepCarousel = ref }}
          contentContainerStyle={styles.scrollViewContainerStyle}
          horizontal
          pagingEnabled
          showsHorizontalScrollIndicator={false}
        >
          <View style={{ flexDirection: 'row', justifyContent: 'space-between', width: screenWidth, paddingHorizontal: cardPadding }}>
            <View style={{ width: imageWidth }}>
              <Image source={{ uri: 'https://image.tmdb.org/t/p/w1280/xBHvZcjRiWyobQ9kxBhO6B2dtRI.jpg' }}
                style={{ width: imageWidth, height: imageHeight }} />
            </View>
            <View style={{ width: imageWidth }}>
              <Image source={{ uri: 'https://image.tmdb.org/t/p/w1280/z7FCF54Jvzv9Anxyf82QeqFXXOO.jpg' }}
                style={{ width: imageWidth, height: imageHeight }} />
            </View>
            <View style={{ width: imageWidth }}>
              <Image source={{ uri: 'https://image.tmdb.org/t/p/w1280/tgcrYiyG75iDcyk3en9NzZis0dh.jpg' }} style={{ width: imageWidth, height: imageHeight }} />
            </View>
          </View>
        </ScrollView>
      </View>
    )
  }
}
Swipe carousel using external buttons
As of now, our carousel is ready and we can swipe left and right to see a card on different slides. Sometimes we need also control over swiping cards means we should be able to change the carousel slide without swiping on it using external buttons. So in that section, we will be seeing how you can change cards using external buttons.
Before starting this section, I had performed a clean up on code. I had created one data file which has card images. I had created slide component that will be rendered through the loop and render slide based on the card count we have. Also written down logic to identify how many slides we can have in the carousel based on data we have. Also added two-button and it's style for this section. Please feel free to check out the code here on (Github).
Here are the code snippets of two main file and you can see how it looks after cleanup.
index.js
import React, { Component } from 'react'
import { View, Text, ScrollView, Image, TouchableOpacity } from 'react-native'
import styles from './style'
import { cardPerSlide } from './config'
import CarouselSlide from './components/Slide'
import movies from './data'

export default class MovieHome extends Component {
  render() {
    const noOfSlides = Math.ceil(movies.length / cardPerSlide)
    return (
      <View style={styles.container}>
        <View style={styles.navBar}>
          <Text style={styles.navBarTitle}>MOVIES</Text>
        </View>
        <ScrollView
          ref={(ref) => { this.stepCarousel = ref }}
          contentContainerStyle={styles.scrollViewContainerStyle}
          horizontal
          pagingEnabled
          showsHorizontalScrollIndicator={false}
          decelerationRate={0}
        >
          {[...Array(noOfSlides)].map((e, i) => {
            const startIndex = i + 1
            const startPosition = ((startIndex + (startIndex - 1)) - 1)
            const endPosition = (startIndex * 2)
            return <CarouselSlide key={i} cards={movies.slice(startPosition, endPosition)} />
          })}
        </ScrollView>
        <View style={styles.buttonContainer}>
          <TouchableOpacity style={styles.button}>
            <Text style={styles.buttonText}>Prev</Text>
          </TouchableOpacity>
          <TouchableOpacity style={[styles.button]}>
            <Text style={styles.buttonText}>Next</Text>
          </TouchableOpacity>
        </View>

      </View>
    );
  }
}
slider.js
import React, { Component } from 'react'
import { View, Image } from 'react-native'
import styles from './style'

class CarouselSlide extends Component {
  render() {
    const { cards } = this.props
    return <View style={styles.slide}>
      {cards.map((card, index) => {
        return <Image source={{ uri: card.url }} style={styles.imageCard} key={index} />
      })}
    </View>

  }
}

export default CarouselSlide
Now to handle the carousel using a button we need to write down logic. First of all, we need to keep track of how many slides the carousel had and which slide is currently visible means index of the slide.
Two functions of scrollview will help us to identify our requirements.
onContentSizeChange: This function will return contentWidth and contentHeight which has been rendered by scrollview. From this function, we will get total width of content to render by the carousel. We need only contentWidth and we can do the math on that to identify total no of cards in a carousel.
Here are a few facts things based on our upper section calculation.
1. Carousel one tile is covering device screenWidth means. 1 slide width = device screen width. Now we have a width of total content render by scrollview and we have width of a single slide. so we can easily identify total slide count using contentWidth/slideWidth which will provide us the number of slides.
const approxSlide = contentWidth / screenWidth
onMomentumScrollEnd: Called when the momentum scroll ends (scroll which occurs as the ScrollView glides to a stop). We will use this function to identify the current slide after swipe. This function provides native events with x and y offset. It provides us scrollview x and y offset. So here we only need contentOffSet of x. We can divide contentOffset by device-width and you will get float number which is the current slide number you need to round of it and convert it to an integer.
const approxCurrentSlide = nativeEvent.contentOffset.x / screenWidth
currentSlide = parseInt(Math.ceil(approxCurrentSlide.toFixed(2)) + 1)
Here is full source code after managing state of current and total number of slides. And utilising above mention two function.
import React, { Component } from 'react'
import { View, Text, ScrollView, TouchableOpacity, Dimensions } from 'react-native'
import styles from './style'
import { cardPerSlide } from './config'
import CarouselSlide from './components/Slide'
import movies from './data'

const { width: screenWidth } = Dimensions.get('window')

export default class MovieHome extends Component {

  constructor(props) {
    super(props)

    // Initially state
    this.state = {
      totalSlide: 0,
      currentSlide: 1
    }
  }

  // function will find out total no of slide and set to state
  setTotalSlides = (contentWidth) => {
    const { totalSlide } = this.state
    // contentWidth received from onContentSizeChange
    if (contentWidth !== 0) {
      const approxSlide = contentWidth / screenWidth
      if (totalSlide !== parseInt(approxSlide)) {
        this.setState({
          totalSlide: parseInt(Math.ceil(approxSlide.toFixed(2)))
        })
      }
    }
  }

  setCurrentSlide = (currentSlide) => {
    this.setState({
      currentSlide
    })
  }


  // function will identify current slide visible on screen
  // Also maintaining current slide on carousel swipe.
  handleScrollEnd = (e) => {
    if (!e) {
      return
    }
    const { nativeEvent } = e
    if (nativeEvent && nativeEvent.contentOffset) {
      let currentSlide = 1
      if (nativeEvent.contentOffset.x === 0) {
        this.setCurrentSlide(currentSlide)
      } else {
        const approxCurrentSlide = nativeEvent.contentOffset.x / screenWidth
        currentSlide = parseInt(Math.ceil(approxCurrentSlide.toFixed(2)) + 1)
        this.setCurrentSlide(currentSlide)
      }
    }
  }

  render() {
    const { totalSlide, currentSlide } = this.state
    const noOfSlides = Math.ceil(movies.length / cardPerSlide)
    return (
      <View style={styles.container}>
        <View style={styles.navBar}>
          <Text style={styles.navBarTitle}>MOVIES</Text>
        </View>
        <ScrollView
          ref={(ref) => { this.stepCarousel = ref }}
          contentContainerStyle={styles.scrollViewContainerStyle}
          horizontal
          pagingEnabled
          showsHorizontalScrollIndicator={false}
          decelerationRate={0}
          snapToAlignment={'center'}
          onContentSizeChange={this.setTotalSlides}
          onMomentumScrollEnd={this.handleScrollEnd}
        >
          {[...Array(noOfSlides)].map((e, i) => {
            const startIndex = i + 1
            const startPosition = ((startIndex + (startIndex - 1)) - 1)
            const endPosition = (startIndex * 2)
            return <CarouselSlide key={i} cards={movies.slice(startPosition, endPosition)} />
          })}
        </ScrollView>
        <View style={styles.cardCountContainer}>
          <Text style={styles.countText}>Total Slides    : {totalSlide}</Text>
          <Text style={styles.countText}>Current Slide : {currentSlide}</Text>
        </View>
        <View style={styles.buttonContainer}>
          <TouchableOpacity style={styles.button}>
            <Text style={styles.buttonText}>Prev</Text>
          </TouchableOpacity>
          <TouchableOpacity style={[styles.button]}>
            <Text style={styles.buttonText}>Next</Text>
          </TouchableOpacity>
        </View>

      </View>
    );
  }
}
Now to change slide based on button click. We need to call the scrollview scrollTo method. For that, we need to have a carousel's reference, using that we can access scrollview events.
scrollTo(): Scrolls to a given x, y offset, either immediately, with a smooth animation. Here is the syntax of the scrollTo function. x offset is for scrolling horizontally and y offset is for scrolling vertically. We will be utilizing x offset because we need to swiper card horizontally.
scrollTo({x: 0, y: 0, animated: true})
On the next button press, we need to scroll to the next slide. Here we need to write down logic to get x offset for the next slide so we can pass it in scrollTo function. And for the prev button click we need logic to get x offset for the previous slide.
As I had already explained how 1 slide width = device screen width. Here it will be useful. For the next slide, we can do currentSlide * screenWidth. It will give us offset for the next slide. Whatever value you will get is end offset of the current slide. Here is the code snippet which you can call on next button click.
const scrollPoint = currentSlide * screenWidth

// this.stepCarousel is refernce to scrollView
this.stepCarousel.scrollTo({ x: scrollPoint, y: 0, animated: true })
Now we will see how we can get offset of the previous slide to scroll. For the previous slide, logic is the same but to understand is tricky. Here we will be deducting count 2 from the current slide. You may think it should be 1 why we are deducting 2. Here is the reason we need starting x offset of a slide to scrollTo. Then only it can slide on the screen. If we do 1 then it will not work properly in case you have a large no of slides. Here is the code snippet which you can call on prev button click.
const pageToGo = currentSlide - 2
const scrollPoint = (pageToGo) * screenWidth
this.stepCarousel.scrollTo({ x: scrollPoint, y: 0, animated: true })
Here is full code that is working with the next and prev button.
import React, { Component } from 'react'
import { View, Text, ScrollView, TouchableOpacity, Dimensions, Platform } from 'react-native'
import styles from './style'
import { cardPerSlide } from './config'
import CarouselSlide from './components/Slide'
import movies from './data'

const { width: screenWidth } = Dimensions.get('window')

export default class MovieHome extends Component {

  constructor(props) {
    super(props)

    // Initially state
    this.state = {
      totalSlide: 0,
      currentSlide: 1
    }
  }

  // function will find out total no of slide and set to state
  setTotalSlides = (contentWidth) => {
    const { totalSlide } = this.state
    // contentWidth received from onContentSizeChange
    if (contentWidth !== 0) {
      const approxSlide = contentWidth / screenWidth
      if (totalSlide !== parseInt(approxSlide)) {
        this.setState({
          totalSlide: parseInt(Math.ceil(approxSlide.toFixed(2)))
        })
      }
    }
  }

  setCurrentSlide = (currentSlide) => {
    this.setState({
      currentSlide
    })
  }


  // function will identify current slide visible on screen
  // Also maintaining current slide on carousel swipe.
  handleScrollEnd = (e) => {
    if (!e) {
      return
    }
    const { nativeEvent } = e
    if (nativeEvent && nativeEvent.contentOffset) {
      let currentSlide = 1
      if (nativeEvent.contentOffset.x === 0) {
        this.setCurrentSlide(currentSlide)
      } else {
        const approxCurrentSlide = nativeEvent.contentOffset.x / screenWidth
        currentSlide = parseInt(Math.ceil(approxCurrentSlide.toFixed(2)) + 1)
        this.setCurrentSlide(currentSlide)
      }
    }
  }

  goToNext = () => {
    const { currentSlide } = this.state
    if (this.stepCarousel) {
      const scrollPoint = currentSlide * screenWidth
      this.stepCarousel.scrollTo({ x: scrollPoint, y: 0, animated: true })
      // following condition is for android only because in android onMomentumScrollEnd doesn't
      // call when we scrollContent with scroll view reference.
      if (Platform.OS === 'android') {
        this.handleScrollEnd({ nativeEvent: { contentOffset: { y: 0, x: scrollPoint } } })
      }
    }
  }

  goToPrev = () => {
    const { currentSlide } = this.state
    if (this.stepCarousel) {
      const pageToGo = currentSlide - 2
      const scrollPoint = (pageToGo) * screenWidth
      this.stepCarousel.scrollTo({ x: scrollPoint, y: 0, animated: true })
      // following condition is for android only because in android onMomentumScrollEnd doesn't
      // call when we scrollContent with scrollview reference.
      if (Platform.OS === 'android') {
        this.handleScrollEnd({ nativeEvent: { contentOffset: { y: 0, x: scrollPoint } } })
      }
    }
  }

  render() {
    const { totalSlide, currentSlide } = this.state
    const noOfSlides = Math.ceil(movies.length / cardPerSlide)
    return (
      <View style={styles.container}>
        <View style={styles.navBar}>
          <Text style={styles.navBarTitle}>MOVIES</Text>
        </View>
        <ScrollView
          ref={(ref) => { this.stepCarousel = ref }}
          contentContainerStyle={styles.scrollViewContainerStyle}
          horizontal
          pagingEnabled
          showsHorizontalScrollIndicator={false}
          decelerationRate={0}
          snapToAlignment={'center'}
          onContentSizeChange={this.setTotalSlides}
          onMomentumScrollEnd={this.handleScrollEnd}
        >
          {[...Array(noOfSlides)].map((e, i) => {
            const startIndex = i + 1
            const startPosition = ((startIndex + (startIndex - 1)) - 1)
            const endPosition = (startIndex * 2)
            return <CarouselSlide key={i} cards={movies.slice(startPosition, endPosition)} />
          })}
        </ScrollView>
        <View style={styles.cardCountContainer}>
          <Text style={styles.countText}>Total Slides    : {totalSlide}</Text>
          <Text style={styles.countText}>Current Slide : {currentSlide}</Text>
        </View>
        <View style={styles.buttonContainer}>
          <TouchableOpacity style={styles.button} onPress={this.goToPrev}>
            <Text style={styles.buttonText}>Prev</Text>
          </TouchableOpacity>
          <TouchableOpacity style={[styles.button]} onPress={this.goToNext}>
            <Text style={styles.buttonText}>Next</Text>
          </TouchableOpacity>
        </View>

      </View>
    );
  }
}
Restrict next and previous button
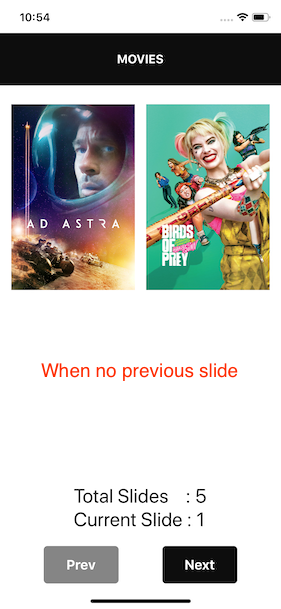
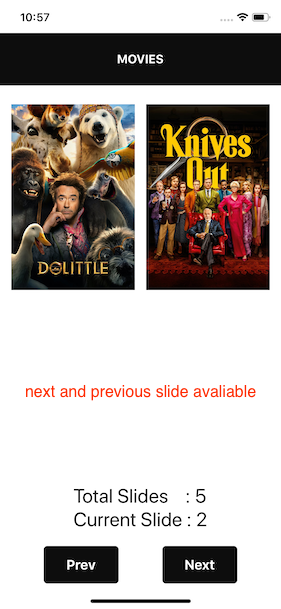
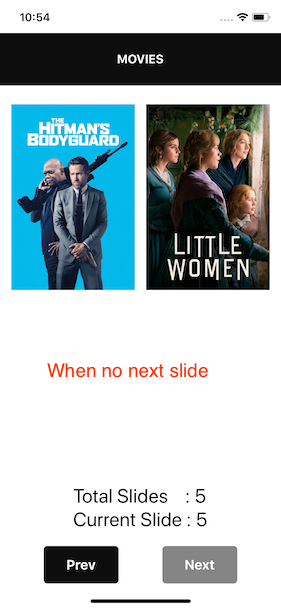
Restriction on next and previous button means to identify is there a next slide to go or is there a prev slide to go. For example, if you are on 1st slide of the carousel then you can't scroll to previous and if you are on the last slide of the carousel then you can't go next. So in these cases, we need to make button disable or provide and visual feedback so the user can identify that there no more slide to go previous or not more slide to go next.
In this section, we will make a button disable when there is no possibility to swiper next or previous. We need to do that logically. For that, we need to additionally maintain 2 more variable states. That is:
  constructor(props) {
    super(props)

    // Initially state
    this.state = {
      totalSlide: 0,
      currentSlide: 1,
      isNext: false,
      isPrev: false
    }
  }
Here is logic to calculate possibility of next and previous slide.
  calculateNextPrev = (totalPage, currentPage) => {
    if (totalPage > currentPage) {
      this.setNext(true)
    }
    if (currentPage === 1) {
      this.setPrev(false)
    }
    if (currentPage === totalPage) {
      this.setNext(false)
    }
    if (currentPage > 1) {
      this.setPrev(true)
    }
  }
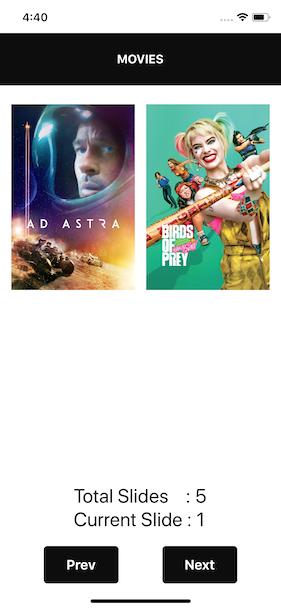
After implementing the next and previous calculation here is a screenshot. You can see the slide count, total slide and button style based on the current slide.
Here is final code snippet of carousel file in which we had cover all then mention 5 points.
import React, { Component } from 'react'
import { View, Text, ScrollView, TouchableOpacity, Dimensions, Platform } from 'react-native'
import styles from './style'
import { cardPerSlide } from './config'
import CarouselSlide from './components/Slide'
import movies from './data'

const { width: screenWidth } = Dimensions.get('window')

export default class MovieHome extends Component {

  constructor(props) {
    super(props)

    // Initially state
    this.state = {
      totalSlide: 0,
      currentSlide: 1,
      isNext: false,
      isPrev: false
    }
  }

  // function will find out total no of slide and set to state
  setTotalSlides = (contentWidth) => {
    const { totalSlide, currentSlide } = this.state
    // contentWidth received from onContentSizeChange
    if (contentWidth !== 0) {
      const approxSlide = contentWidth / screenWidth
      if (totalSlide !== parseInt(approxSlide)) {
        this.setState({
          totalSlide: parseInt(Math.ceil(approxSlide.toFixed(2)))
        })
        this.calculateNextPrev(parseInt(approxSlide), currentSlide)
      }
    }
  }

  setCurrentSlide = (currentSlide) => {
    this.setState({
      currentSlide
    })
  }


  // function will identify current slide visible on screen
  // Also maintaining current slide on carousel swipe.
  handleScrollEnd = (e) => {
    if (!e) {
      return
    }
    const { nativeEvent } = e
    const { totalSlide} = this.state
    if (nativeEvent && nativeEvent.contentOffset) {
      let currentSlide = 1
      if (nativeEvent.contentOffset.x === 0) {
        this.setCurrentSlide(currentSlide)
      } else {
        const approxCurrentSlide = nativeEvent.contentOffset.x / screenWidth
        currentSlide = parseInt(Math.ceil(approxCurrentSlide.toFixed(2)) + 1)
        this.setCurrentSlide(currentSlide)
      }
      this.calculateNextPrev(totalSlide, currentSlide)
    }
  }

  goToNext = () => {
    const { currentSlide } = this.state
    if (this.stepCarousel) {
      const scrollPoint = currentSlide * screenWidth
      this.stepCarousel.scrollTo({ x: scrollPoint, y: 0, animated: true })
      // following condition is for android only because in android onMomentumScrollEnd doesn't
      // call when we scrollContent with scroll view reference.
      if (Platform.OS === 'android') {
        this.handleScrollEnd({ nativeEvent: { contentOffset: { y: 0, x: scrollPoint } } })
      }
    }
  }

  goToPrev = () => {
    const { currentSlide } = this.state
    if (this.stepCarousel) {
      const pageToGo = currentSlide - 2
      const scrollPoint = (pageToGo) * screenWidth
      this.stepCarousel.scrollTo({ x: scrollPoint, y: 0, animated: true })
      // following condition is for android only because in android onMomentumScrollEnd doesn't
      // call when we scrollContent with scrollview reference.
      if (Platform.OS === 'android') {
        this.handleScrollEnd({ nativeEvent: { contentOffset: { y: 0, x: scrollPoint } } })
      }
    }
  }

  setNext = (status) => {
    const { isNext } = this.state
    if (status !== isNext) {
      this.setState({
        isNext: status
      })
    }
  }

  setPrev = (status) => {
    const { isPrev } = this.state
    if (status !== isPrev) {
      this.setState({
        isPrev: status
      })
    }
  }

  calculateNextPrev = (totalPage, currentPage) => {
    if (totalPage > currentPage) {
      this.setNext(true)
    }
    if (currentPage === 1) {
      this.setPrev(false)
    }
    if (currentPage === totalPage) {
      this.setNext(false)
    }
    if (currentPage > 1) {
      this.setPrev(true)
    }
  }

  render() {
    const { totalSlide, currentSlide, isNext, isPrev } = this.state
    const noOfSlides = Math.ceil(movies.length / cardPerSlide)
    return (
      <View style={styles.container}>
        <View style={styles.navBar}>
          <Text style={styles.navBarTitle}>MOVIES</Text>
        </View>
        <ScrollView
          ref={(ref) => { this.stepCarousel = ref }}
          contentContainerStyle={styles.scrollViewContainerStyle}
          horizontal
          pagingEnabled
          showsHorizontalScrollIndicator={false}
          decelerationRate={0}
          snapToAlignment={'center'}
          onContentSizeChange={this.setTotalSlides}
          onMomentumScrollEnd={this.handleScrollEnd}
        >
          {[...Array(noOfSlides)].map((e, i) => {
            const startIndex = i + 1
            const startPosition = ((startIndex + (startIndex - 1)) - 1)
            const endPosition = (startIndex * 2)
            return <CarouselSlide key={i} cards={movies.slice(startPosition, endPosition)} />
          })}
        </ScrollView>
        <View style={styles.cardCountContainer}>
          <Text style={styles.countText}>Total Slides    : {totalSlide}</Text>
          <Text style={styles.countText}>Current Slide : {currentSlide}</Text>
        </View>
        <View style={styles.buttonContainer}>
          <TouchableOpacity style={[styles.button, !isPrev && styles.disable ]} onPress={this.goToPrev} disabled={!isPrev}>
            <Text style={styles.buttonText}>Prev</Text>
          </TouchableOpacity>
          <TouchableOpacity style={[styles.button, !isNext && styles.disable]} onPress={this.goToNext} disabled={!isNext}>
            <Text style={styles.buttonText}>Next</Text>
          </TouchableOpacity>
        </View>

      </View>
    );
  }
}
That's it folks in this article. I hope you all will like my article. Feel free to ask the question in the comment section. Also, share the article with other folks as well.
You will find the article source code in GitHub repo: here . Everything that we performed through this article has been pushed to the repo. Also, I had added a video showing how that step carousel works.
Thank you. I will be back with more interesting articles.