Customize Your React Native App with Multiple Flavors/Schemas
In this tutorial, we’ll be discussing Build Types. We’ll see how they make our React-native Development easier and faster especially when we’re creating applications with minimal differences. These differences can be as small as changes in themes and app icons or can be for different stages of the product such as Dev, QA, Production etc.
We will understand multi configuration as we want to install three different application simultaneously on the device. For example, We want to bundle three different app shares with same source code and having display name Dev, QA and Production.
Here we go!
First of all create a React Native project using react-native-cli. Now, as we all know React-Native provides hybrid solution for mobile application. So, we will divide this tutorial in two parts, Android and iOS.
Android
Note: Once you add Product Flavors to your app, you will no longer be able to build a flavorless version.
Adding ProductFlavor
- Open your project’s android/app/build.gradle file.
- Add a new section called productFlavors and put our flavor specific configuration here.
- Use a different applicationId for each flavor so we can have them all installed on the device at the same time.
- Don’t forget the add the flavorDimensions “default” line or the build will error.
android {
	...
	flavorDimensions "default"
	...
	productFlavors {
        dev {
            minSdkVersion rootProject.ext.minSdkVersion
            applicationId 'com.awesome.project.dev'
            targetSdkVersion rootProject.ext.targetSdkVersion
            resValue "string", "build_config_package", "com.myapp"
        }
        prod {
            minSdkVersion rootProject.ext.minSdkVersion
            applicationId 'com.awesome.project'
            targetSdkVersion rootProject.ext.targetSdkVersion
            resValue "string", "build_config_package", "com.myapp"
        }
        qa {
            minSdkVersion rootProject.ext.minSdkVersion
            applicationId 'com.awesome.project.qa'
            targetSdkVersion rootProject.ext.targetSdkVersion
            resValue "string", "build_config_package", "com.myapp"
        }
    }
}
Here we are done with flavor creation.
Running and building the Build Variants
We should now be able to run our Android project using a specific flavor by passing in a variant argument.
So to run the dev version in debug mode, we will use
— variant=<productFlavour><BuildType>
react-native run-android --variant=devDebug --appIdSuffix=devLikewise, for QA build command would be:
react-native run-android --variant=qaDebug --appIdSuffix=qafor Production build command would be:
react-native run-android --variant=prodDebug //as prod build don't have suffix in applicatIdFor, to make release build follow below commands
assemble<ProductFlavour><BuildType>
cd android && ./gradlew assembleDevRelease  //Dev release
cd android && ./gradlew assembleQaRelease  //QA release
cd android && ./gradlew assembleProdRelease  //Prod release
After running all mentioned commands, you will find all three application on device, but you won't find any difference on build. Let's make minimal difference on every build.
Custom icons for each build variant
- Go to your app’s android/app/src folder.
- There should be a folder called main. Let’s create three more folders here, one for each of our product flavors.
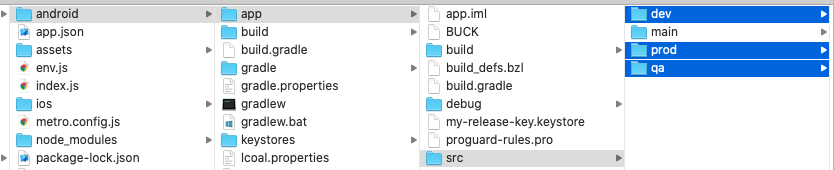
Place any flavor specific icons inside these folders. Take a look inside the main folder if you need a reminder of the folder path for each type of app resources.
Different app names for each build variant
Let’s say we want to change the display name of our dev build to Awesome Dev. We can achieve this by adding a strings.xml to android/app/src/dev/res/values.
<resources>
    <string name="app_name">Awesome Dev</string>
</resources>
Likewise we can add string res file in respective flavor folder.
Please note that the contents of strings.xml will be merged with the strings.xml inside the main folder instead of replacing it.
That's all from Android section.
iOS
Adding new configurations
- Select your project under PROJECT in XCode and in the Info tab, search for Configurations.
- There you should have two default configurations — Debug and Release.
- Click on the + button and duplicate both, name them Dev.Debug and Dev.Release respectively and same as for QA.

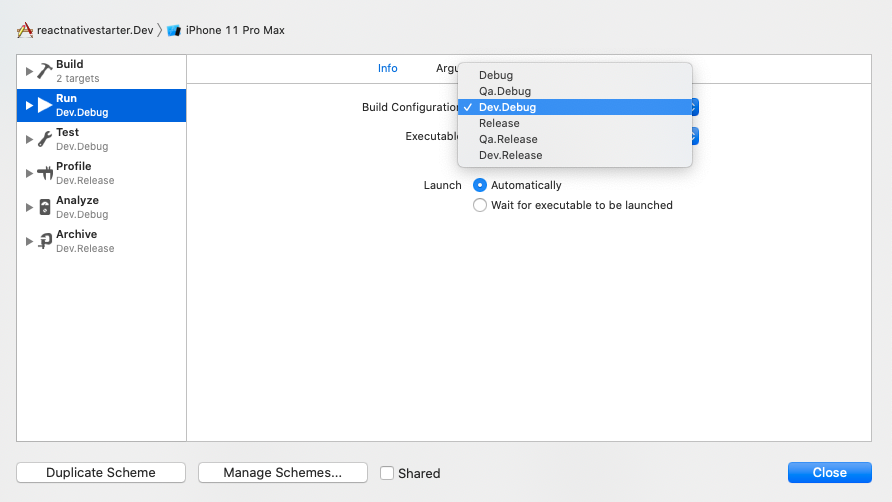
Adding new schemes
- Click on your current active scheme and from the drop down select Edit Scheme, this will open the scheme management window.
- Click on the Duplicate Scheme button at the bottom of the window to make a copy of your current scheme, name it Dev. Don’t close this window as we are not done yet!
- Change the Build Configuration of Run, Test and Analyze to use the Dev.Debug we created earlier. Change Profile and Archive to Dev.Release.
- Perform same thing for QA.
- Make sure your project should be shared.
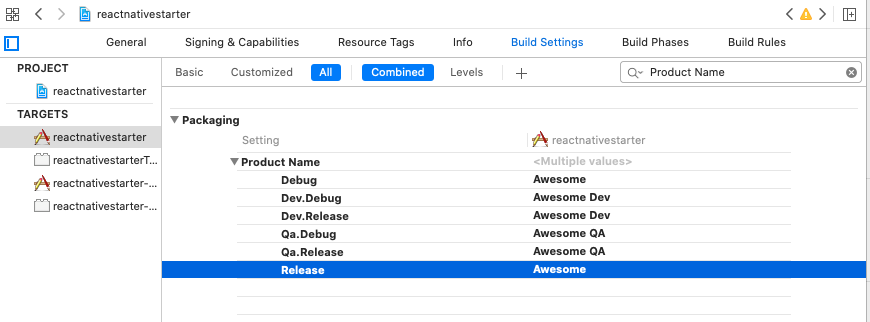
Different display names
- Select your Target and in the Build Settings tab, search for Product Name.
- For both Dev And QA change the display name.
- In the project’s info.plist, change the value of Bundle display name to $(PRODUCT_NAME).
For React Native ≥0.60.0
For each configuration you’ve added, also add the following corresponding entries to your PodFile.
platform :ios, '9.0'
require_relative '../node_modules/@react-native-community/cli-platform-ios/native_modules'

project 'awesome',
        'Dev.Debug' => :debug,
        'Dev.Release' => :release,
        'Qa.Debug' => :debug,
        'Qa.Release' => :release,
        'Prod.Debug' => :debug,
        'Prod.Release' => :release

target 'awesome' do
  # Pods for awesome
...
For React Native <0.60.0
Skip this section if you are using React Native 0.60 or above
Please refer react-native-schemes-manager library for configuration.
Running multiple configurations side by side
To be able to run multiple configurations side by side, we will need to set a unique bundle ID for each of them.
- Select your Target and in the Build Settings tab.
- Click on the + button and select Add User-Defined Settings to create a new user setting.
- Name BUNDLE_ID_SUFFIX. Add the suffix .dev to Dev.Debug and Dev.Release likewise .qa to Qa.Debug and Qa.Release.

In the project’s info.plist, change the value of Bundle Identifier to $(PRODUCT_BUNDLE_IDENTIFIER)$(BUNDLE_ID_SUFFIX).
You should now be able to have all versions installed at the same time.
Different icons for different configurations
- In Xcode create a new Icon Set, name it Appicon.dev and Appicon.qa
- Copy and paste all the Dev version icons assets to ios/<project_name>/Images.xcassets/AppIcon.dev.appiconset and for QA
ios/<project_name>/Images.xcassets/AppIcon.qa.appiconset. - Select your Target and in the Build Settings tab, locate the Asset Catalog App Icon Set Name setting.
- Change the values of Dev.Debug, Dev.Release and Qa.Debug, Qa.Release to AppIcon$(BUNDLE_ID_SUFFIX).
- Run the app again and each version should now be using it’s own icons.